Pinky, Sparkly Birthday Card

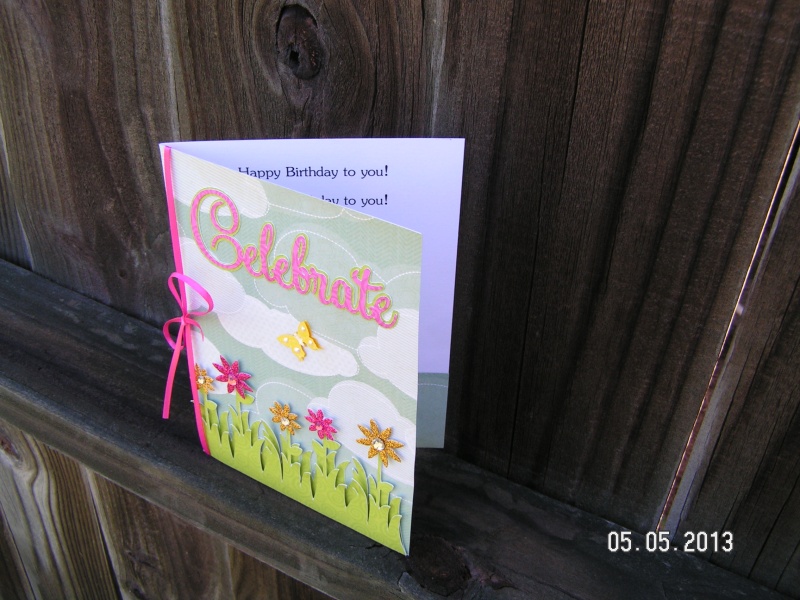
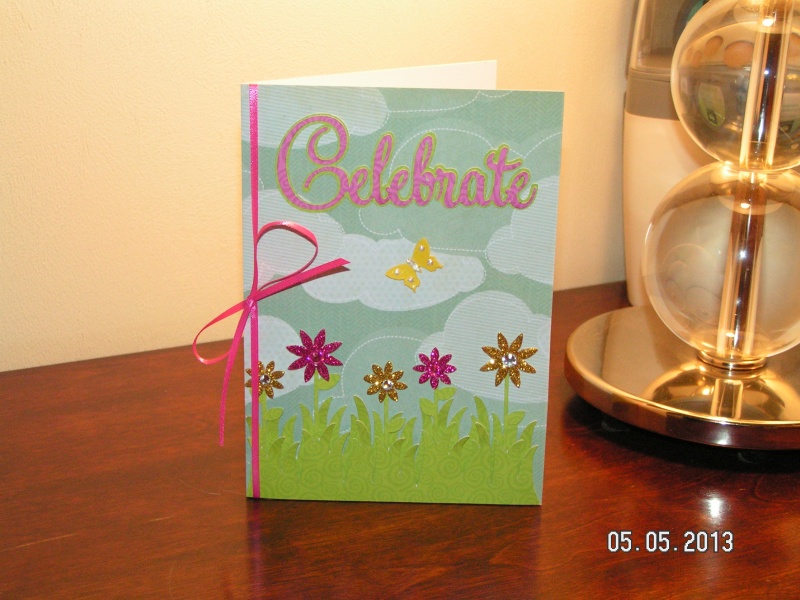
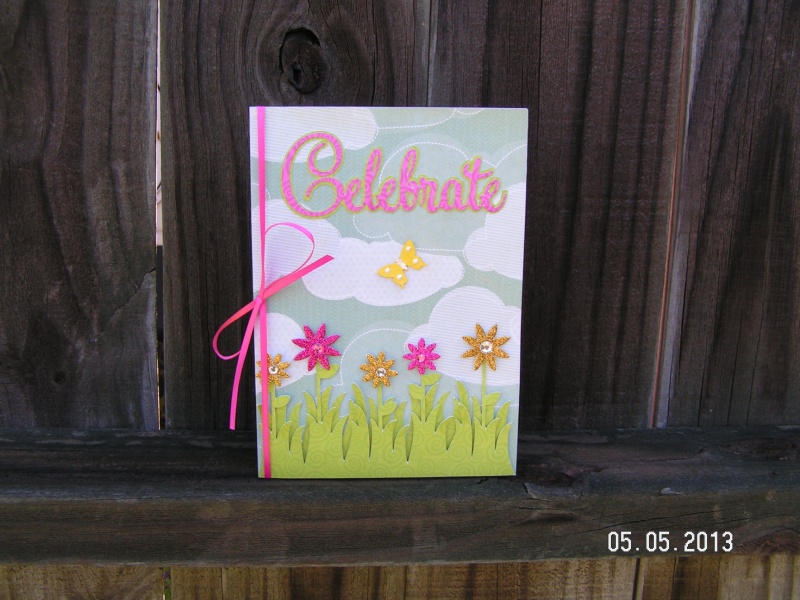
Here is a 5 x 7 birthday card I made for my sister. It’s really girly and was easy to make using the flower stickers from American Crafts Dear Lizzy 5th & Frolic. The fun cloud paper is from Michael’s Recollections All Seasons Cardstock Paper (8.5 x 11 stack). I trimmed a sheet down to 5 x 7 inches and adhered it to the white card base using my pink Scotch ATG gun.

Pinky, Sparkly Birthday Card

Side View

The grass layers (base and base shift)  were cut from Straight from the Nest (SFTN) at 2.5 inches. The bottom grass layer was adhered directly to the card base and then I used foam dimensionals to raise up the top grass layer that has the flower stems. I used The Paper Studio’s Celebrations paper pack for the grass and for the word “Celebrate”. The Celebrate layers (phrase and phrase shadow) were cut from SFTN at 1.5 inches. The Zig 2-Way glue pen does a perfect job for these smaller, intricate cuts. I added a pop of bright pink 1/8 inch ribbon and tied a bow. I punched 2 butterflies out of yellow cardstock using a punch from Emagination. I glued one directly to the card base and then used a glue pen on the center of the top butterfly so I could raise its wings a bit. Before adhering the top butterfly, I coated it in Clear Rock Candy Distress Stickles, let it dry, and then used Liquid Pearls White Opal to add some more detail.

Celebrate Birthday Card

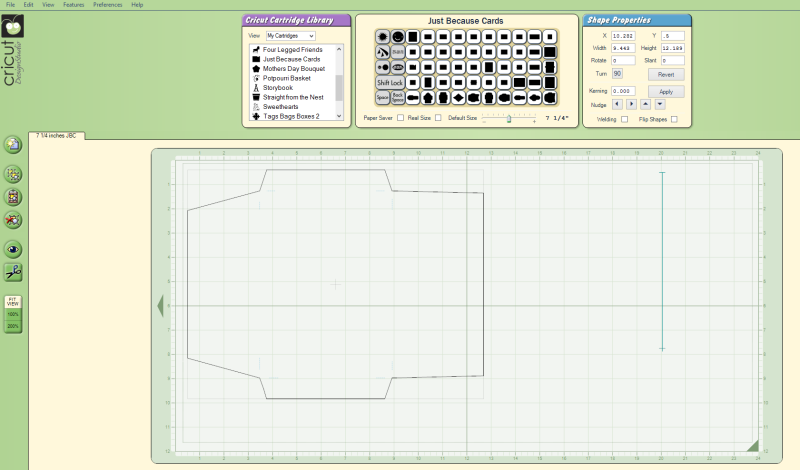
I like how this card came together easily but with fun, girly colors and lots of sparkle. For a quick 5 x 7 envelope, use “Just Because Cards” and cut out the third envelope on the bottom row of the key pad at 7 1/4 inches. For these larger envelopes, a 12 x 24 mat and longer paper are needed. I use 11 x 17 cardstock from Desktop Publishing Supplies. I also used Design Studio to rotate my envelope 90 degrees to have the envelope cut lengthwise. I hide the score marks before cutting for a cleaner look and use my score board to score the folds. A 7 1/4 inch envelope leaves plenty of room for the 5 x 7 card that may have slightly raised dimensional layers.

Envelope (JBC)

Envelope JBC 7.25 inches for a 5x7 card

Bird Cage Shaped Card

Happy November 1st! We are now in the countdown to Thanksgiving which is one of my favorite holidays other than Christmas! 🙂 For those who stop by and check out my little crafty corner, I thank you for your visit! And for the wonderful people who follow my blog and leave such sweet, supportive comments, please know I appreciate you all so much. Your support gives me the confidence to share my paper crafts with you through this blog. I’m still learning and growing in this hobby and thrilled that I can share the journey with so many people who love paper crafts as much as me! My sweet Mom recently celebrated a birthday and we had a wonderful time with presents, cake, and ice cream. I made her a bird cage shaped card accented with a pretty K & Company die-cut butterfly. Below are clickable photos showing how to create this card using the Cricut Lite Bloom cartridge and Design Studio:

Cage Shadow – 6 inches

Cage Shadow – Distressing with Brown Ink

Hand-trimmed inked shadow layer to hide behind white cage

6 inch cage with flower centers – white cardstock

Back side of white cage with inked shadow layer trimmed to fit

Welded Bird Cages – 6 inches – inner cuts hidden (cut in light blue cardstock)

Layers of cage shaped card

Flower and leaves layer – 6 inches (cut 2 sets in turquoise for dimension)

Flowers – 6 inches (cut 2 sets in red for dimension)

Side view of cage shaped card

Details close-up

Cage Shaped Card

Supplies:

  • Colorbok 12×12 Textured Cardstock, Soft Pastels (light blue, white, turquoise) – Wal-mart
  • Ampad Earth Tone Cardstock (tan) 8 1/2 x 11 – Wal-mart
  • Red patterned paper – My Mind’s Eye “Simply Delightful”
  • Butterfly Die-cut – K & Company Que Sera Sera Die-Cuts & Acetates
  • Pearl Embellishments – Michael’s
  • Tan Hemp Cord – Wal-mart
  • Stampabilities Brown Ink – Hobby Lobby
  • Foam Adhesive Dimensionals – Michael’s

Summer Bouquet of Spiral Roses

Here’s another paper bouquet, but made with spiral roses this time. I love the fun pops of color and I plan on using it as decor in my craft room. The materials used were all found in my stash – left over from previous crafts. For a wonderful tutorial on cutting spirals and then rolling them to make your own roses, check out Kay at Kay’s Kreative Korner. I used her technique in an earlier post: My First Spiral Rose and Miniature Envelope.

I don’t have a specialized tool to roll flowers so I use a pencil. Sometimes this leaves a big whole in the center if I don’t re-roll tightly by hand. To help fill in the centers of a few roses, I cut out thin strips of paper, rolled them, and then hot glued them to the centers. I played with the colors by combining a pink center to a yellow flower, etc. I love the two-toned look in a single rose. I also used a pair of scallop scissors on three of the spirals to get two different looks. When you’re holding your scissors, you will be able to see how the scallop blade will cut. Holding them one way will give you a positive (rounded) scallop edge and then flipping them over will give you a negative (pointy) edge. The smoother-edged roses were cut with regular scissors.

  • Metal tin, butterfly, styrofoam, 1/8 inch wooden dowels – Hobby Lobby (all left over from a previous bouquet – to stain the dowels green, I used a green ink pad and a sponge dauber)
  • Ribbon scraps, paper grass, umbrella pick – found in my stash
  • Leaves – cut at 4.5 inches from the Wild Card cartridge (left over from a previous bouquet)
  • Hot glue gun – used to assemble the spiral roses and glue them to the leaf-dowels

Thanks for checking it out!

Vanessa

Hydrangea Birthday Card

Hello again! I made this hydrangea birthday card for a young lady in our family whose favorite color is lavender.

The hydrangea flower is from Walk In My Garden (5 inches). The marquee frame is made using Storybook and Design Studio. I placed a 6 inch marquee shapeinside a 5×7 rectangle so that the shape would cut out leaving the wood patterned paper frame. I cut another 6 inch marquee in cream cardstock and ran that through a Sizzix Damask folder. Here’s a tip I learned out of necessity tonight – my marquee was a little longer than my A2 embossing folder so I took the part that didn’t emboss on the first pass and turned it around and placed it near the bottom of the folder (with most of the embossed marquee sticking out). I then ran it through the embossing machine again. By carefully lining it up with the pattern’s bottom edge, the unembossed tip of the marquee received the needed embossing. Hope this makes sense! 🙂 The frame is raised up with foam dimensionals. I seem to be raising thingsup a lot lately. Guess I’m addicted to the 3-D look! I inked the hydrangea’s edges and the little flowers with brown ink for an aged, distressed look. I then accented the little flowers with pearl adhesives and pinched the petals up a bit. I’m not that tickled with the leaves. I wanted to show the cut lines so I first used a clear ink embossing pen hoping it would darken the lines a bit more than it did. Then I got bold and used some brown ink but it came off too strong, so lastly I resorted to Stardust Stickles to save the flower as much as I could. Sometimes things go the way you want, sometimes they don’t. Overall, I like the idea of the card and its colors so I will try to overlook the leaves.

The inside sentiment was done in Word. The larger font (26 pt.) is called “Waterfalls” which is a free scrapbook font available at Kevin & Amanda’s website. The direct link for this font is here. Just read the terms of use and give proper credit to “Kevin & Amanda” if you post projects online using their fonts. The other font is from Word called “Bookman Old Style” in 18 pt.

Well that’s it! Thanks for checking out my lavender-inspired birthday card! Hope you all had a wonderful 4th of July holiday!

~Vanessa

My First Spiral Rose and Miniature Envelope – Thank You Card

So here I was on Memorial Weekend playing around in my craft room and getting stuck on how to embellish a card from Cricut’s “Just Because Cards”. The card design I chose to work with features a ladybug and a phrase called Cute As a Bug (key 25), but I wasn’t happy with the choice of papers I used for the card base so it took me in a completely different direction. Since I had chosen to use Colorbok’s Rosewood patterned paper, I just couldn’t envision a cutesy phrase and ladybug being incorporated. The paper has a vintage feel so I wanted to play up on the femininity of the paper. Side note – I got the Rosewood paper pad from Wal-mart for only $5.00.

My Leap Into Spiral Roses

I’ve noticed on Pinterest that spiral roses are becoming quite popular on cards, so of course I had to try my hand at it to see if I could even do it. I thought the general concept of cutting a spiral out of paper would be easy but I found myself looking for tutorials after I messed up a couple of sheets of paper! Thankfully, I found this lovely blog called Kay’s Kreative Korner that kept me from pulling my hair out. Thank you Kay for the lovely tutorial. I found your instructions to be more helpful than some other sites I visited. I used a pencil to get me started in rolling the pink spiral and then finished rolling it by hand. I followed Kay’s tip on inking the edges so I used brown ink and a sponge dauber. I think it helps add some shadows, allowing for the spiral layers to be more noticeable. I then adhered the finished flower together using Zip 2 Way Glue.

So now I had my finished spiral rose and I decided to add a large pearl in the center to help hide my flower’s lacking center! Then I realized that my card needed something else so I cut some leaves using my Mother’s Day Bouquet cartridge in various sizes (1 inch, 1 & 1/4 inches, and 1 & 1/2 inches). This helped embellish the rose but I had a lot of white space on the front of the card and I knew I needed a sentiment and something else that would go with the vintage feel.

“Miniature” Inspiration

Inspired by thoughts of Scarlett at Blue Purple and Scarlett, I made a tiny envelope to slip a literal Thank You note inside! Scarlett’s blog features adorable miniature stationery sets complete with a miniature folder to hold the tiny envelopes and note paper! She created several designs and each has a unique feel to it based on the style. If you check out her site, you will be inspired!

To make my miniature envelope, I used my Wild Card cartridge and used the Scallop envelope (key 1) cut at 1 & 1/2 inches. I also cut the corresponding envelope liner at 1 & 1/2 inches. When the envelope is closed it measures 1 & 1/2 by 2 & 1/8 inches and when open it’s 2 & 3/4 by 2 & 1/8 inches. It’s so tiny and cute! I used a small piece of cream cardstock for the little note and used a “Thank You” rub-on for the sentiment. I then trimmed the note to fit the width of the envelope (just so it can be tucked all the way inside if desired). The note isn’t adhered, allowing for more fun at moving it around 🙂 ). I inked the edges with brown ink to age it a bit and stuck it into the envelope at an angle so the sentiment can be read. The envelope is raised up with foam dimensionals.

For the inside of the card, I adhered another mat layer of Colorbok’s Rosewood paper and trimmed some roses out of the remaining 12×12 sheet. I inked the edges of the rose image to add some dimension against the mat. I tied a pink bow around the middle of the card to complete it. I like the journal feel of the inside of the card. There’s plenty of room for someone to write a handwritten message, adding to the vintage design as well. Before computers and store-bought cards (I’m thinking Victorian and earlier eras), people corresponded with handwritten letters and would bundle them together with twine or ribbon for safe keeping. And instead of blogging, they wrote their thoughts into well-worn journals. I miss that tactile notion of putting pen to paper and this card makes me smile thinking about those romantic, older times.

Thanks for looking!

Vanessa
A Daisy For Her

This is a card I made for a family member who has an upcoming birthday.  She is a young, independent woman who has been dealing with some of life’s challenges all on her own, away from family.  I am sending this card to send sunny days her way to let her know we are thinking of her and wish her much happiness.  When I think of her, this daisy flower personifies her charm, wit, and spunkiness.  She is loyal, supportive, and caring of family and friends alike.  I admire her courage in a tough world that seems to always impose challenges at the worst possible moments, but she overcomes and still manages a smile and a joke.  Happy Birthday Sharon and I hope sunny days come your way with bright blue skies.

Card Details
  • Cricut’s Walk In My Garden Cartridge (daisy)
  • Paper
    1. Wausau’s Mocha Mix – Royal Fiber Driftwood cardstock
    2. My Mind’s Eye Simply Delightful – light blue and polka dot paper
  • Embellishments ~ large light-blue button, Hemp cord in light green, D’vine Swirls Cuttlebug folder, pink & white striped ribbon from Dear Lizzy assortment, pink adhesive gems, Martha Stewart “You’re Invited” stamp, black stamp pad, and ‘Happy Birthday’ rub-on in white
Assembly

I paper trimmed and folded the card base first and laid it aside.  I paper trimmed polka-dotted paper measuring 4 1/2 x 6 1/2 (this allows the 5 x 7 card base to be exposed a 1/4 inch on all sides to create a layering effect) and then paper trimmed light blue paper measuring 4 1/2 x 1 1/2.  I took a Martha Stewart’s “You’re Invited” stamp that had a nice frame around the words and I trimmed a piece of scotch tape to cover up the words inside the frame.  I stamped this modified stamp into a black Stampabilities ink pad and then removed the inked-up piece of tape so that it wouldn’t put a black smudge on my paper.  Now my stamp is only inked on the frame which I then stamped to the center of the blue strip of paper.  I waited for it to dry before using a white rub-on ‘Happy Birthday’ sentiment.  Then I applied a small pink adhesive gem on each side of the sentiment to add interest. I then adhered the blue strip over the polka-dotted’s bottom edge.  I ran my Scotch adhesive tape runner over a strip of ribbon and wrapped the ribbon around the paper to cover the area where the two papers meet.  I then adhered this completed card layer over the 5 x 7 card base.

The daisy was the last thing adhered to the card. I cut three WIMG daisy images at 4 inches on ivory cardstock and ran each daisy through a Cuttlebug folder called D’vine Swirls.  I took one daisy and adhered it to the polka dotted paper using a Zig Way 2 glue pen (this daisy was glued down flat).  I then took the second daisy and rotated the image so that the petals didn’t land in the same place as the first for a fuller appearance.  Once satisfied, I glued just the center of the daisy down and repeated the process with the third daisy (rotating and gluing only the center).  Since the second and third daisies’ petals were freely moving I was able to take the end of a paintbrush (a pen would work too) and curl the petals downward.  This gives the flower a 3-D look.  I then found a large light-blue button in my stash that was a perfect size for the center of the flower and I ran some light green hemp cord through the button and tied a bow.  I used white Elmer’s school glue to glue the button to the daisy’s center.  This glue seems to hold well from past experiences.

Mother’s Day Cards

I hope all of the mothers out there had a wonderful Mother’s Day yesterday!  I created my very first mother’s day greeting cards for my mother and mother-in-law this past week and had so much fun making them with my Cricut Expression.  I used the Wild Card, Walk in My Garden, and Storybook cartridges to create the rose and hydrangea cards shown above.  The card base was cut from white cardstock and all of the colored paper came from the My Mind’s Eye “Simply Delightful” paper stack.

Rose Card

Wild Card Cuts ~ Cut a 5 inch scallop card (pg. 32) from white cardstock; made the following cuts from red and white polka dot paper: cut the liner (pg. 32) for the card face and the scallop frame (pg. 32) for the inside of the card at 5 inches; cut “Happy Mother’s Day” phrase (pg. 39) from dark brown paper at 6 inches

Walk in My Garden Cuts ~ Cut a 2 inch pot (pg. 91) and then pressed shift to cut the flower pot rim from dark brown paper; cut four roses (pg. 98) at 2 inches (roses took three cuts  ~ cut the rose with stem in light green, then cut the detailed rose head in red paper by pressing shift, then cut the flower head in pink paper using the blackout feature)

Storybook Cuts ~ Cut a 3 1/2 inch oval in dark brown paper by pressing accent blackout and the shift key (pg. 53); cut a 3 1/4 inch oval in white cardstock by pressing accent blackout and the shift key (pg. 53).  I ran the white oval through my Sizzix embosser using the Swiss Dots Cuttlebug folder

Used pink gauze ribbon with white polka dots from the Paper Studio pastel ribbon pack (Hobby Lobby)

Hydrangea Card

Wild Card Cuts ~ Cut a 5 inch scallop card (pg. 32) from white cardstock; made the following cuts from multi-color polka dot paper: cut the liner (pg. 32) for the card face and the scallop frame (pg. 32) for the inside of the card at 5 inches; cut “Happy Mother’s Day” phrase (pg. 39) from dark brown paper at 6 inches

Walk in My Garden Cuts ~ Cut a 2 inch vase (pg. 102)  from dark brown paper; cut five hydrangeas (pg. 101) at 2 inches (hydrangeas took three cuts  ~ cut the flower with stem in light green, then cut the flower heads by pressing shift in light blue paper, then cut another set of flower heads in darker blue paper for variety)

Storybook Cuts ~ Cut a 3 1/2 inch oval in dark brown paper by pressing accent blackout and the shift key (pg. 53); cut a 3 1/4 inch oval in white cardstock by pressing accent blackout and the shift key (pg. 53).  I ran the white oval through my Sizzix embosser using the Swiss Dots Cuttlebug folder

Used light blue gauze ribbon with light blue satin borders from the Paper Studio pastel ribbon pack (Hobby Lobby)