I Promise It’s Me and I’m back…

This is my attempt at ‘dusting off the old cobwebs’ on this blog. I’ve missed you buddy and I’ve missed my blog friends even more. Though you have not seen me here lately, some may have seen me in a different forum. I’m a monthly contributor at Die Cut Crazy, a monthly digital magazine for die cut lovers. I thought I would share some past magazine projects with you as a way to say ‘hello old friends’.

DIE CUT CRAZY JULY 2013

Chalk Coloring Method - Mini Notes

GEDSC DIGITAL CAMERA

GEDSC DIGITAL CAMERA

DIE CUT CRAZY AUGUST 2013

GEDSC DIGITAL CAMERA

DIE CUT CRAZY SEPTEMBER 2013

GEDSC DIGITAL CAMERA

GEDSC DIGITAL CAMERA

DIE CUT CRAZY OCTOBER 2013

GEDSC DIGITAL CAMERA

GEDSC DIGITAL CAMERA

GEDSC DIGITAL CAMERA

If you’re interested in learning more about Die Cut Crazy (DCC), I hope you check out their website and their Facebook page. They are a growing magazine which is getting better and better with each issue! I’m so tickled to be a part of this journey. The contributors are a wonderful group of women (though I hope to see some crafty guys join up too)! And Stephanie, the Editor, is so sweet and helpful. She and her lovely husband, Jeremy, make the magazine magic happen with each issue. Not only is the magazine filled with contributors’ tutorials and photos, but there are card and scrapbook galleries for even more inspiration. If you’re feeling crafty ladies and gents and want to share your creations, send DCC an email. You might find yourself in their next issue! More details are provided in their post here.

Die Cut Crazy (DCC) offers three ways to purchase and download – via iPhone, iPad, or PDF. To check out the details in iTunes, click here. For a PDF version, click the DCC website here. The PDF version is perfect for those like me who do not have an iPhone or iPad. Just pay 99 cents and the issue is yours to keep on your computer. Easy-peasy-lemon-squeezy!

My final note is to say how much I’ve missed my fellow blog buddies and visitors. I hope to ‘see’ you again soon. I have a lot of blog visiting to do to see what you all have been up to.  I’ve missed your talented creations and want you to know how much you inspire me.

Thank you,

Vanessa

Free Sample Issue from Die Cut Crazy

Here’s another exciting update from Die Cut Crazy, the digital magazine for paper crafters! While they continue to test their PDF subscription option at their website, they are offering a free PDF sample for you to try! All you have to do is “Pay with a Tweet” or “Pay with a Facebook post” to download the PDF from their website. Once you’ve downloaded it, you can even save it to your computer to keep! Click their link for more details and for your free issue: http://diecutcrazymag.com/2013/07/24/die-cut-crazy-in-pdf-form/.

DCCIssue6CoverRetina

Father’s Day Card with Treat Box

Father’s Day has passed but I wanted to share a Father’s Day Card with treat box that was published in the June issue of Die Cut Crazy. Thanks Stephanie for letting me share my project! I used Cricut’s Tags, Bags, Boxes, and More 2 for the card and shirt box.

TBBM2 - Father's Day Card and Treat Box

Shirt Box - TBBM2

TBBM2 - shirt treat boxes

TBBM2 - Tie Tag Father's Day Card

Here are some exciting updates happening at Die Cut Crazy (DCC):

  • The digital magazine is now available for the iPhone in addition to the iPad.
  • It’s being tested for the Android platform.
  • A PDF version is in the works and will be available soon at their website: http://diecutcrazymag.com/.
  • They’re offering a two month free subscription. Click on the link for more details, but hurry, the code is only good through July.
  • They’re hosting a summer themed challenge. Submissions are due in 2 days – sorry for the late heads up. The winning entry will get a Sizzix Texture Boutique embossing machine!
  • Die Cut Crazy now offers card and scrapbook galleries to showcase your projects. If you would like your project to be published in DCC, send them an email at diecutcrazymag@gmail.com.
  • Die Cut Crazy is on Instagram. Their name is @diecutcrazy. If you tag your posts with #diecutcrazy, they’re happy to share them with their followers and in the magazine.
  • Follow Die Cut Crazy on Facebook to receive further updates.

It has to be romantic… and masculine?

So, my husband and I will be celebrating an anniversary soon and it’s time for another masculine card but one that also expresses LOVE. Sigh! I’m starting to think that a romantic masculine card is the trickiest of all the masculine card categories! When my creative well runs dry, I tap into inspiring sources. Usually a quick tour through Pinterest ends the drought, but sometimes it’s just good to visit your blog pals. It’s amazing how many delightful and inspiring cards are hiding in people’s blogs of all places! 🙂

So with renewed vigor, this is what I came up with after being inspired by Sarah at The Handmade Card Blog. Please check out her elegant anniversary card here. I love her patterned paper choices underneath her punched out hearts and that gorgeous woodgrain paper from Simon Says Stamp. I tried to mimic the look using a woodgrain folder by Tim Holtz but used a darker palette of kraft cardstock framed by mats in black.

Studio Calico Polaroid frame; Cricut Sweethearts heart

Recipe

  • Kraft and black cardstock (A2 sized card)
  • Sizzix Texture Fades Tim Holtz – woodgrain embossing folder
  • Heart aperture – Cricut Sweethearts cartridge (2.5 inches)
  • Studio Calico “Yearbook Collection” Polaroid Die-Cut Frame
  • Studio Calico “Darling Dear” 6×6 patterned paper (underneath heart aperture)
  • Amy Tangerine Remarks “Cute Overload” Puffy Heart Sticker
  • Red Baker’s Twine (Martha Stewart)
  • White Gel Pen (wrote in the year)
  • Dimensional Adhesive

Masculine Anniversary Card

Sending wishes that you’ll be inspired by someone or something today!

Vanessa

Two Hearts – Anniversary Card

Here is an A2 anniversary card I made for my parents’ 46th wedding anniversary! It’s a simple card with only two die-cut hearts from the Sweethearts cartridge but I think the colorful paper does the rest. The pretty blue card base is from Michael’s Recollections Preppy Beach cardstock and the cheery patterned paper is from American Crafts’ Pebbles Seen & Noted.

2heartsanniversary

I love the chevron paper! Is that an old trend now or did I make it in time! 🙂 I cut two of these chevron hearts at 2.5 inches – gluing one onto the card and popping the other one on top with dimensionals. I offset the left heart cut at 3 inches to have it go off the page a bit. I’m liking this style.

I used Fiskars All Year Greetings Stamps and StazOn Black Ink for the sentiment and a corner rounder on the bottom edges. I finished it off with baker’s twine from Martha Stewart.

The timing of this anniversary card with Jo’s Fun-day Friday Challenge worked out great! FFC #4 is “Anything Goes!!!!” To check out the challenge on Jo’s blog, click here.

Thanks for looking!

Vanessa

BBQ Under the Oaks – Wishful Thinking

You know how you have an idea in your head and you envision it to be fabulous without really thinking about logistics or other little issues such as weather? Perhaps you did think of rain but you didn’t count on excessive heat that normally occurs in August.

Sometimes you have to admit defeat and give in – make little concessions and realize what’s more important such as comfort and just being with family, instead of how pretty something would have looked under the oak trees during a summer evening in the south.

I was having a Martha Stewart (MS) moment. This happens occasionally and as I get older I’m learning to set my eyes on more realistic goals. But recently I had a MS slip up once again in preparation for a “Family Celebration”. We were celebrating my husband’s birthday, Father’s Day, and my parents’ 46th wedding anniversary in one big event. We were going to have a family BBQ on my parents’ farm underneath some stately oaks covered in spanish moss, but with temperatures reaching 96 and air so thick you could hardly breathe, comfort won out and we went with Plan B to have the BBQ inside.

So the mason jar tealight extravaganza we were going to hang from the oak trees was nixed and a two layered banner I spent hours on wasn’t used. Instead we had an indoor BBQ at my parents’ house and it turned out perfect anyway. We had a wonderful time and the food was amazing. We had grilled hamburgers and sausages from the guys, and baked beans, potato salad, fresh broccoli salad, deviled eggs, Strawberry Cheesecake Salad, and homemade cupcakes from the ladies. And more importantly, everyone was comfortable – no gnats or mosquitoes, and no sweltering heat.

If I had thought of it, I could have brought my banner over and hung it on Mom’s fireplace. Instead it sits hanging on my fireplace as if it were still waiting to be transported to the pasture to be hung between two pine trees. The mason jars are sitting in my Mom’s guest room. I guess I’ll save them for another event when it’s cooler – maybe in the Fall. My sister added ribbon to each jar and they turned out so pretty but for now we’ll just have to use our imagination on how it would have looked illuminating the old oak trees.

Here is a pic of the unused banner. Using a bbq/picnic theme, I went for the Kraft and gingham look.

banner

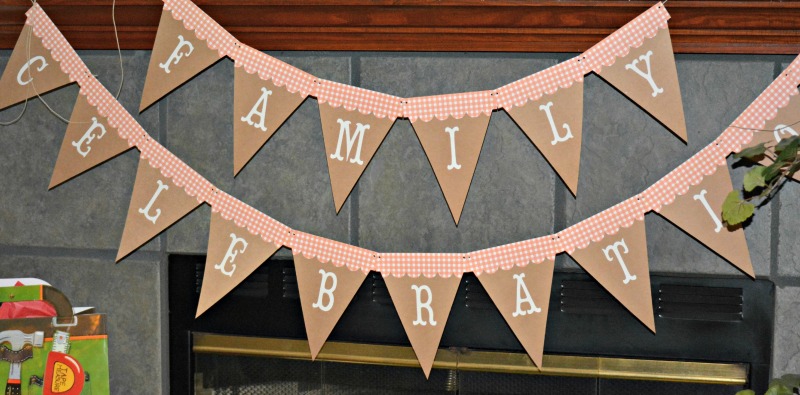
The banner and its toppers are cut at 7.5 inches from Straight from the Nest and the letters spelling “Family Celebration” are cut from Storybook at 2.5 inches. The red gingham paper is from DCWV’s “Nana’s Kitchen” stack. The banner base is cut from 8.5 x 11 Kraft cardstock. I was able to fit two banner triangles on one sheet and used 9 sheets in total. I threaded short pieces of twine, knotting them at the back, to connect all the banner pieces together and then added two longer lengths of twine on the ends for hanging.

Family Celebration Banner

Now back to the MS moment that did work – I tried out a new recipe I found on Pinterest and it was a hit. Family members asked for the recipe and I would like to share the source and recipe here. It’s a perfect summer dessert and I will definitely be making it again. It’s called “Strawberry Cheesecake Salad” found on “Mommy’s Menu”. The only alteration I made was to leave out the bananas. You’re supposed to add in the bananas right before serving but I did a taste-test in between and fell in love with how it tasted just like Strawberry Cheesecake without them.

Strawberry Cheesecake Salad
Serves about 10

12 oz. whipped topping (I used Cool-Whip)
1 small package of cheesecake pudding powder
3 (6 oz) strawberry yogurts (I used Yoplait)
1 lb fresh strawberries, sliced
*3 bananas, sliced (add just before serving or they brown) – (I omitted this step)
miniature marshmallows (add just before serving)

In a large salad bowl stir together whipped topping, yogurts, and pudding powder. Let this set up in the fridge for at least an hour before serving. Wash and slice strawberries. You can add strawberries to salad or wait to add them with sliced bananas and marshmallows just before serving. Keep refrigerated. 

Strawberry Cheesecake Salad

Note – it doesn’t say how many marshmallows to add so I tried half a bag and stirred and then I just went for it and added the whole bag of miniature marshmallows. It turned out great and as it sat in the fridge an hour before the BBQ, the marshmallows got softer in the pudding mixture and got even better. This salad reminds me of Watergate Salad or what we call here in the south, Pistachio Fluff. It uses the same idea – cool whip, pudding mix, some kind of fruit, and miniature marshmallows.

I also made cupcakes in honor of my husband’s birthday and tried out a new cake mix – Betty Crocker Supermoist Cake Mix, Golden Vanilla. It made a wonderful cupcake and I will be using this brand again. I couldn’t lay my hands on my favorite buttercream icing recipe so I used the one listed on the back of Domino’s Confectioners Sugar but it turned out too sweet. I had my mother-in-law and sister taste it and we all thought another stick of butter would mellow it out. It did and it was delicious! I will now use this altered recipe for future cakes:

Icing Recipe (I doubled Domino’s Recipe and added an extra stick of butter)

Makes Plenty of Icing for Piping Swirls onto 24 cupcakes:

7 1/2 cups – (2) 1 lb. boxes of Domino® Confectioners Sugar
1 1/2 cups – butter (3 sticks), softened (Land O Lakes salted)
8 tablespoons – milk
2 teaspoons – vanilla extract

In a large bowl with electric mixer at low-speed, combine sugar, butter, milk and vanilla. Beat at medium speed 1 to 2 minutes until creamy. If desired, add more milk until frosting is spreading consistency.

Many thanks to my sister for adding some fun colors to the icing – neon green and blue using McCormick’s Neon! Food Coloring. She piped on swirls to all of the cupcakes while I made the Cheesecake salad. We had a great time cooking with only a few stressful moments in getting everything done in time to be carried over to our parents’ home. The cupcakes were tricky in transporting, but overall they fared well.

cupcakes

Loved Beyond Measure

I rummaged through my scrapbook and paper stashes, and the computer, to make this 5×7 card for my husband’s birthday. He is a tool guy and probably has around 10 tape measures. The tapes must only be one brand and only one width – Stanley 3/4 inch. Length doesn’t matter as long as it’s at least 12 feet. 🙂 He always says, “You can never have too many measuring tapes.” But he also says this about flashlights and scissors… and socket wrenches, screwdrivers, and any other kind of tool.

LovedBeyondMeasure

When he’s not stuck behind a desk, he loves getting his hands dirty. His idea of a relaxing weekend is working on a tractor or refurbishing scrap to make something useful. He’s unique and I love him.

So this card is in honor of him and what he loves most – tools. One of his favorite sayings is “Measure twice, cut once”. I think he heard Norm Abram say this on the New Yankee Workshop (which also happens to be the title of Norm’s book), though I also think his dad instilled this important truth in him at an early age.

I found the card sentiment from an unlikely source. I recently bought a small storage box from Dollar General. It was only a dollar, plus I just liked how the box looked. It’s decorated with a ruler, button, and butterflies. It states on the front “Loved Beyond Measure” and that’s where this card idea came from. So there I was trying to find a measuring tape design in my patterned paper stash. I couldn’t find anything resembling a tape measure but I did find a sheet of various colored rulers in an “All Seasons” pad by Recollections. It’s intended for a “back to school” theme but I cut out the yellow ruler to mimic a Stanley tape measure. And because my husband loves woodworking, I used a tan sheet of wood grain paper from Crate Paper’s On Trend line. The actual tape measure clip art is from my computer. I printed it twice onto grey cardstock to dull the colors a bit and hand trimmed each piece. One piece is glued directly to the card and the other is raised up with dimensionals. I typed the sentiment in Word using Bernard MT Condensed 20 pt. font. I trimmed the phrase down with a paper trimmer and then hand cut the banner ends. I’ve noticed a new trend in cardmaking to offset points of interest so I let the banner go beyond the card’s edge. I like the way it looks. It can be tricky for an envelope but I will just cut one a bit larger in Design Studio.

The 12×12 tan woodgrain paper used to make the card face has a blue scalloped edge where the company name is listed. I cut a section of this trim to add some more color to the bottom of the card. The darker woodgrain strip, also from On Trend, was added last to build up the bottom design. I think it adds a nice break from the lighter background. I used these same papers for the inside of the card and printed a message with my computer.

InsideMsgMeasure

The cute toolbelt is a Jolee’s scrapbook embellishment I’ve had since around 2007. I bought this toolbelt thinking I would make a scrapbook page dedicated to some of my husband’s woodworking projects. Since that has not happened yet, I used it for his birthday card. It fit the theme and why not? 🙂 Better to use it now than it sit in the box for another 6 years! Do you see the tiny nail adhered directly to the card?

The red baker’s twine is from Martha Stewart. I added three tiny brads to the left corner with a 1/16th hole punch. And the last touch was using a corner rounder on the right edges of the card.

So that’s my dedication to my tool-loving, woodworking, and mechanically inclined husband. 🙂 He better like it after the scavenger hunt mayhem I commenced in my craft room. This truly was a labor of love.

Die Cut Crazy Update

It’s official! My Father’s Day project with card is published in Die Cut Crazy’s June issue. This is a digital magazine currently offered on the iPad. Here is the cover as seen in iTunes!

Die Cut Crazy Mag

Stephanie, the Editor, sent me my screen shots so I could see how my tutorial and photos looked! I don’t have an iPad so I appreciate her letting me see the end result! It was neat seeing my photos and words designed on a page in magazine format. It looked great! I was also featured under their “Blogger Spotlight” section which shares a short bio and some of my favorite card creations.

Die Cut Crazy posted an update on their blog that mentions the reduced cost of subscriptions, as well as releasing their digital magazine to the iPhone in the near future. They are also working on making it available on other tablet devices. My fingers are crossed for the Kindle Fire – that’s the one I have. 😉 Check out their post here: http://diecutcrazymag.com/2013/06/08/our-readers-have-spoken-and-were-listening/.

Birthday Card – FFC Sketch Challenge

Hello! I have never done a sketch challenge before but thanks to Jo at Jo’s Scrap Shack, I took the plunge and I’m so happy I did. My niece’s birthday is coming up so I decided to use the sketch as my inspiration to make Amber’s card. She is turning 11 and growing up so fast!

Ice Cream Sundae Birthday Card

If you want to check out the sketch to see how I did, go to Jo’s post here. Every Friday, she hosts a Funday Friday Challenge (FFC) and everyone is invited to play along! This sketch challenge ends June 7th, 6:00 pm CST. Winners will be announced on Monday, June 10th.

Ice Cream Sundae - JBC

Card Recipe

Cricut’s Just Because Cards – Sundae (3.5 inches)

Cricut’s Fancy Frames – Frame and oval (4.25 inches)

Cuttlebug Embossing – D’vine Swirls & Swiss Dots

Glossy Accents

White Gel Pen

Adhesive gems

Dear Lizzy Ribbon

Dear Lizzy 5th & Frolic Thickers (foil letter stickers)

Assorted papers (Recollections All Seasons, Colorbök, and Kraft cardstock)

Inside message printed in Word

Inside of Card

Quick & Simple Birthday Card

My sister-in-law’s birthday ‘snuck’ up on me so I made a quick birthday card today to get it in the mail! The Kraft card base measures 5×7. Then I added mats in orange and cream. I stamped a “D” in turquoise ink from Ink It Up! for Debbie’s initial and ran it through a Swiss Dots embossing folder. I framed this with another orange mat. Using a Uni-ball Signo white gel pen, I added some “stitching” and then embellished the card with “Special Moments” stickers I found last week at Dollar Tree. They even have little rhinestone embellishments. What a great find for $1.00!

GEDSC DIGITAL CAMERA

I printed the inside message using my computer and added another 3-D sticker and some more faux stitching.

GEDSC DIGITAL CAMERA

Thanks for checking it out!

Vanessa